INSTRUMENTS / GENERATORS
Wave Traveller
Wave Traveller is an accurate vinyl scratch simulator and sample-playback manipulator.
Instead of trying to recreate the effect by operating in realtime on a virtual turntable, such as the Scratcher plugin, here you can assign a scratch "phrase" to each note by drawing and fine tuning special "path" splines the generator follows to recreate the effect. Another closely related plugin is the Gross Beat audio-stream effect.
You have a complete freedom on the spline forms, wave range and speed.
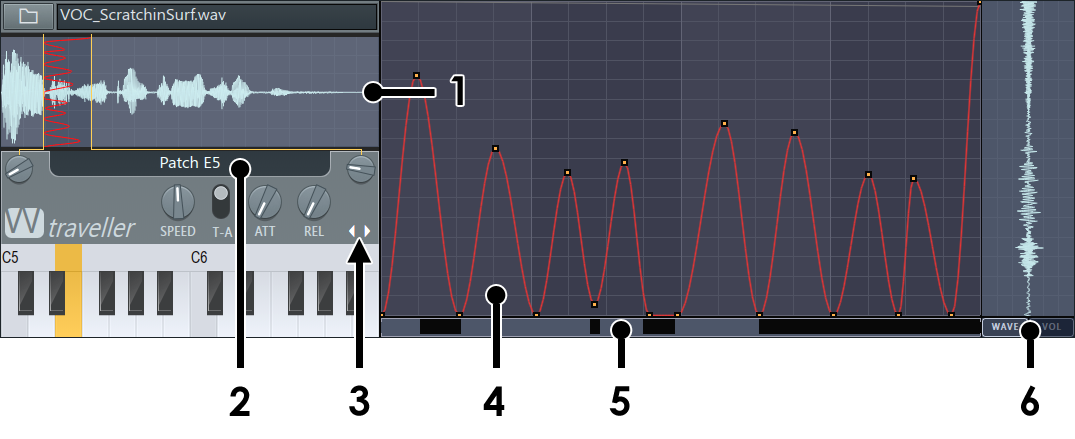
- Wave preview panel - Shows the selected wave.
- Patch Selector - Click here to change the patch/wave.
- Keyboard View Scroll - Scrolls the preview keyboard.
- Scratch edditor panel - The curve shown here defines how the play-head will move back and forth over the sample.
- Mute control bar - Left-click and drag on the bar to Mute (dark ranges). Right-click and drag to Unmute (light ranges).
- Edit mode - Edit the scratching playback envelope (WAVE) or playback volume envelope (VOL).
NOTE: The Piano Keyboard contains a Right-click menu.
How to Use
Select a Sample to Scratch
Click the Browse Sample button at the top left side of the window and select a sample to use.
Select a Patch to Edit
Each note contains a separate patch, with its own settings and scratch phrase. To select a patch to display and edit, please click on the Patch Selector (2) or click the corresponding key on the preview keyboard. If the key is not visible, use the Keyboard View Scroll buttons (3) to display different octaves on the keyboard.
Define a Phrase for the Patch
The phrase depends on the active region you select to use for the scratch, the speed and the path spline. You can also define a custom attack (fade in) and release (fade out after key release) for each patch.
The region is defined by the Start and End button you can find at the bottom left and bottom right side of the Preview Panel (1). You can see in the preview panel the section which is going to be used for the phrase.
The Speed knob and the T-A switch define the speed of the phrase (which also affects its pitch, like with a real vinyl). Read more about these settings in the Parameters section below.
The path spline is defined in the Path Definition Panel (5). This is basically a spline which defines the way the generator "travels" back and forth on the sample as time progresses, i.e. horizontal dimension represents time, while vertical dimension represents the wave position (only in the region defines by the Start and End buttons). You can see the used section of the wave displayed vertically on the right side of the panel (as you can see in the screenshot above). The path spline itself it a set of basic spline section connected to each other. For more information on how to work with this panel, see the Parameters section below.
NOTE: You can also define a spline to alter the volume over time in the same panel or mute certain sections of the phrase, see Parameters below for more information.
Play a Patch
To play a patch simply use the Piano roll or Step Sequencer to trigger the note the patch is assigned to.
Parameters
Preview Panel
The preview panel displays a preview of the full wave, the range defined by the Start and End buttons and the path spline inside that region.
Settings Panel
- Start - Use to set the start point, of a region of the sample, to be scratched in the current patch.
- End - Use to set the end point, of a region of the sample, to be scratched in the current patch.
- Patch Selector (2) - Click on the patch selector to see a list of patches available to the generator (each note holds a single patch). Select a patch to edit and you will see its properties displayed in the window.
- Speed - Scratch playback speed. This support two modes (selected with the T-A switch). In Tempo Based mode, the speed knob defines a number of steps as the length of the phrase (fractions are also allowed), while in Absolute mode you set the speed as a percent of the original wave speed (i.e. 100% speed with a straight path spline plays the wave at normal speed).
- T-A Switch - Defines whether the phrase speed is defined as tempo based value (steps) or absolute value (as a percent of the original wave speed).
- Attack (ATT) - Attack time (fade in) for the current patch.
- Release (REL) - Release time (fade out after key release / note end) for the current patch.
- Keyboard View Scroll Keys (3) - These keys allow you to scroll the preview keyboard left or right with an octave so you can access the whole piano range available to the FL Studio generators.
Preview Keyboard
The Preview Keyboard allows you to preview and select patch for editing (simply click a key to select/preview). If the key is not visible, use the Keyboard View Scroll Keys (3) to scroll the view to access it.
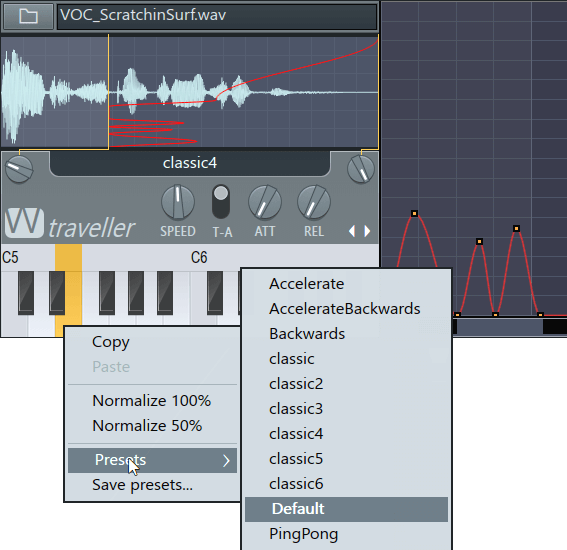
- Right-click the preview keyboard to show a menu of options, note you must Left-click the particular key/preset you want to act on -
- Copy/Paste - Copy/Paste the selected preset.
- Normalize 100%/Normalize 50% - Adjusts the wave-path to 100% and 50% of the sample duration respectively.
- Presets - Opens a pop-up menu of Wave Traveller presets (most self explanatory).
- Save Preset - Save the currently select preset.
Path Definition Panel
The Path Definition panel allows you define the actual phrase"path" inside the wave region selected by the Start and End buttons. You can also adjust the volume envelope and mute certain section in the phrase.
Working with the Spline Editor
The spline is a set of points connected by simpler spline types (sine, line , etc.), where the segment types, points number and positions are user defined.
- To add a new point, Left-click in the panel area.
- To delete a point, Right-click it and from the menu select Delete.
- To change a segment type, Right-click the point on its right side and select a spline type to be used: Half Cosine, Linear, Bezier, Tension, Quarter Sine, Quarter Cosine.
Spline Segment Types
The following spline types are available on Right-click:
| Spline Name | Spline Preview | Description |
| Half Cosine |
 |
This spline represent 1/2 of the phase of the cosine function. |
| Line |
 |
Connects the two points with a straight line. |
| Bezier |
 |
This is a classic bezier spline with two handles which can be used to adjust the spline's start and end slope. This spline type provides an additional setting - Locked (Right-click a point for bezier segment and check or uncheck Locked). When Locked is on, the two handles that appear on the left and right side of two bezier segments are locked in a straight line, ensuring a smooth transition between the segments. |
| Tension |
 |
This is a special 'tension'-based spline segment the shape of which depends on the position of a special handle (the circle in the middle of the spline). |
| Quarter Sine |
 |
This spline represent the first 1/4 of the phase of the sine function. |
| Quarter Cosine |
 |
This spline represent the first 1/4 of the phase of the cosine function. |
Setting the Volume Envelope
Each patch in fact contains two paths - "travel" path, displayed by default, and a volume envelope path you can see and edit by using the WAVE/VOL switch at the bottom right of the panel. The volume envelope can be defined using the same spline segments, where the bottom most position means volume 0% and the topmost - 100%.
Mute Regions in the Patch
You can select specific regions to be muted inside the current patch. Left-click and drag in the Mutes Definition Area (5). Black regions show muted areas. To unmute a region, Right-click and drag instead.
Notes & Tips
- The motion of a moving hand (as with a real scratching) is best approximated by the Half Cosine spline.
- The Bezier spline can create a curve that goes outside of the range of the two points that define it (horizontally). Since time always progresses linearly for the phrases, such sections of the spline are ignored.
Plugin Credits
- Code - Robert Conde
- GUI - Miroslav Krajcovic